A well-planned pelmet design elevates any room instantly. In addition, it bridges awkward wall transitions smoothly. It turns ordinary drapery into a polished, high-end design statement. For example, you can introduce subtle minimalist structure to a bedroom. Similarly, you can conceal brackets across an expansive living room window. In both cases, thoughtful window treatments create instant visual balance.
Window dressings have changed significantly over recent years. Previously, homeowners associated them with heavy, dust-gathering fabrics. However, modern window treatments now favor clean, tailored profiles. Furthermore, they combine exceptional functionality with sleek aesthetics.
What Is a Pelmet and Why Are Designers Bringing It Back?
In interior architecture, a pelmet is a framework placed above a window to conceal curtain rods, tracks, and fittings while reducing drafts and light bleed. It mounts directly to the ceiling or wall. Consequently, it encloses the vulnerable open gap above your curtains.
Minimalist trends spent years removing decorative trim entirely. However, designers quickly ran into practical problems. For instance, uncovered tracks often appear industrial and harsh. In addition, curtain headings tend to sag over time. Morning light also spills over the top of standard curtain poles. Therefore, modern decorators are returning to this timeless feature. They now use crisp geometric angles and seamless ceiling blends to frame natural light.
Architectural Comparison: Structural Boxes vs. Fabric Toppers
Homeowners often confuse different window treatments. Therefore, understanding the differences helps you choose the right style for your home:
-
Hard Timber or Plaster Framework: This is a rigid, box-like structure mounted above windows. It is commonly called a cornice board in American design. Moreover, it features clean perpendicular corners. You can paint, plaster, or upholster the surface easily.
-
Soft Fabric Valance: This style uses gathered or pleated fabric hung loosely from a rod. However, valances offer zero thermal insulation. Instead, they serve an ornamental purpose and suit country-cottage decors.
-
Recessed Ceiling Pocket: Builders integrate this channel directly into a drywall ceiling. As a result, curtains drop down smoothly without any visible fascia board for pelmet design.
The choice between a rigid box and a fabric topper depends on function. A rigid enclosure is the best option if you need insulation and full light blockage.
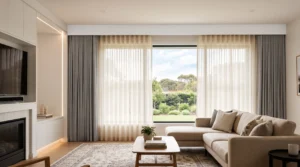
Thermal Insulation, Light Control, and Acoustic Performance
Beyond high-end aesthetics, a closed-top framework delivers significant functional advantages.
The Thermal Barrier and Convection Loop Blocking
Uncovered glass causes major seasonal heat loss. During winter, warm room air rises toward the ceiling. Next, it slips over the open curtain heading. The air then cools against the cold glass pane. Finally, it drops downward and returns to the living room. This cycle is called a convective loop.
A fitted overhead box creates an airtight physical seal. Because it blocks warm air from moving behind the fabric, it stops this draft cycle. Consequently, it can cut window heat loss by up to 25 percent.
True Hotel-Grade Blackout Performance
Standard blackout curtains often disappoint users. This happens because bright morning sun spills over the track. It casts an annoying light halo across the ceiling. Fortunately, an enclosed overhead box traps that upward glare completely. Therefore, it is ideal for nurseries, media rooms, and bedrooms.
Acoustic Softening
Bare plasterboards and window glass bounce sound waves constantly. As a result, rooms develop noticeable echoes. When you pad an overhead box with acoustic foam, it dampens reverberation. Additionally, using dense fabrics like wool or bouclé helps muffle outside street noise.
Inspiring Modern Pelmet Ideas for Contemporary Spaces
Modern styling focuses on clean textures and architectural continuity. Here are eight stylish ideas for contemporary homes and pelmet design:
-
The Plastered-In Ceiling Recess: Builders run drywall across the ceiling with a drop-down lip. Consequently, curtains glide down like a continuous wall of fabric.
-
Monochromatic Color Drenching: You can paint the box the same color as the adjacent wall. As a result, the room feels noticeably taller.
-
Fluted and Ribbed Timber Accents: Slatted wood adds mid-century texture. Thus, it breaks up flat drywall surfaces with natural warmth.
-
Contemporary Scalloped Profiles: Clean wave curves on the bottom edge add personality. Therefore, this style works well in modern children’s rooms.
-
Concealed Indirect LED Lighting: You can mount an LED channel behind the front panel. Hence, warm light washes softly down the fabric at night.
-
Padded and Fabric-Wrapped Upholstery: Wrapping the frame in foam and linen adds rich texture. Furthermore, it lets you complement your room rugs and wallpapers.
-
Arched and Curved Architectural Casings: Curved frames suit heritage bay windows perfectly. Consequently, they preserve original architecture without blocking curtain movement.
-
The Floating Slimline Fascia: A slim 12mm board provides a neat Scandinavian touch. Meanwhile, it hides hardware without adding unnecessary visual bulk.
Smart Home Automation and Motorized Hardware
Motorized curtain tracks add incredible everyday convenience. However, their motor housings and cables can look bulky.
An overhead box conceals these components cleanly. When setting up automated tracks, keep internal dimensions in mind. Specifically, leave 50 millimeters of extra vertical clearance. This extra space lets you remove the motor easily for servicing or charging.
Sizing Rules, Clearances, and Proportions
Accurate dimensions prevent an installation from looking bulky or crowded. Use these standard guidelines when planning your project:
| Measurement Parameter | Recommended Dimension | Design Purpose |
| Fascia Height (Drop) | 1/6th to 1/8th of total ceiling drop | Keeps visual balance without overwhelming the window |
| Single Track Internal Depth | 100 mm to 120 mm | Fits single pleat curtains without fabric friction |
| Double Track Internal Depth | 180 mm to 200 mm | Accommodates both sheer curtains and blackout drapes |
| Wave Fold (S-Fold) Clearance | 150 mm minimum depth | Allows deep, uniform fabric folds to move freely |
| Horizontal Overhang (Stack-Back) | 150 mm to 250 mm past window frame | Lets curtains open past the glass to maximize natural light |
Step-by-Step Guide to Building a Custom MDF Box
Building a custom box is an easy weekend DIY project. In addition, it costs significantly less than custom carpentry.
Essential Tools and Materials
-
12mm or 18mm MDF boards
-
Softwood mounting battens (2×1 timber)
-
Construction adhesive and wood glue
-
Countersink screws and wall anchors
-
Spirit level, tape measure, and stud finder
-
Hand saw or circular saw
-
Decorator’s caulk, wood filler, and sandpaper
-
MDF edge primer and interior wall paint
Step 1: Secure the Mounting Battens
First, locate your wall studs or ceiling joists with a stud finder. Next, mark a level reference line above the window frame. Secure your timber battens along this guide line using grab adhesive and screws. If you are attaching to hollow drywall, use heavy-duty hollow-wall toggle bolts instead.
Step 2: Measure and Cut the Fascia Panels
Carefully measure the full width across your window opening. Be sure to include your planned fabric stack-back margins. Then, cut your front panel from 12mm or 18mm MDF. If the installation stops mid-wall, cut two side return pieces to close the ends cleanly.
Step 3: Assemble and Fasten the Framework
Dry-fit your panels to check alignment against the ceiling. Next, apply wood glue along the contact edges. Screw the front panel into the ceiling batten using countersunk pilot holes. Afterwards, attach the side returns securely and clamp the corners until the glue sets.
Step 4: Fill, Caulk, and Sand
Add corner blocks inside the joins for extra strength. Then, fill all screw holes and seams with wood filler. Once the filler dries, sand it smooth with 120-grit sandpaper. Finally, apply flexible decorator’s caulk along the wall joints to hide small gaps.
Step 5: Seal, Prime, and Paint
Raw MDF edges absorb paint rapidly. Therefore, seal all cut edges with an acrylic edge sealer or shellac primer first. Once dry, roll two coats of interior paint across the surface. Matching the surrounding wall paint creates a seamless, built-in look.
Maintenance, Child Safety, and Long-Term Care
Once installed, your window treatment requires very little maintenance:
-
Dust Prevention: Wipe the upper shelf with a microfiber cloth every few months. This prevents dust from collecting on the gliders below.
-
Child and Pet Safety: Secure all manual curtain cords with wall clips at least 1.5 meters high. This eliminates dangerous dangling loops.
-
Fabric Care Accessibility: Ensure you have enough hand clearance inside the enclosure. This makes removing curtains for washing simple and quick.
With accurate measurements, pelmet design, durable materials, and thoughtful styling, an overhead window framing box provides lasting insulation and modern elegance for any home.